
Off-grid solar sounds intimidating until you realize every system — from a pocket-sized camping kit to a whole cabin — is the same four parts doing the same four jobs. We've built, broken, and rebuilt enough of these systems over the years to know where beginners actually get stuck, and it's almost never where the textbooks say. This guide walks you through the components, the math, and the honest shortcuts we'd recommend to a friend starting from zero.
What "off-grid solar" actually means
An off-grid solar system generates and stores its own electricity with no connection to the utility grid. Sunlight hits panels, panels make DC power, a charge controller feeds that power safely into a battery, and an inverter turns the battery's DC into the AC your appliances expect. That's the whole story. Cabins, RVs, vans, boats, and backyard sheds all run on this same loop — only the sizes change.
Two things make this a great moment to start. First, lithium iron phosphate (LiFePO4) batteries have gotten dramatically cheaper over the past few years and now dominate the market, which removed the single worst part of old off-grid systems: babying fragile lead-acid batteries. Second, portable all-in-one power stations have matured to the point where you can get a real, working solar setup running in an afternoon with zero wiring.
The four components, in plain English
1. Solar panels
Panels convert sunlight to DC electricity, rated in watts under ideal lab conditions. In the field, expect roughly 70–85% of the sticker rating in good direct sun, less when it's hazy, hot, or the panel is flat on the ground instead of tilted at the sun.
The panel landscape in 2026 is simpler than the old guides suggest:
- Monocrystalline is now the default for nearly everything worth buying. Mainstream panels run around 21–23% efficient, and newer N-type cells push to roughly 25%. If a panel doesn't say otherwise, it's mono.
- Polycrystalline has largely disappeared from new consumer products. You'll mostly see it in old stock and bargain-bin kits. We'd skip it — the price gap that once justified it is gone.
- Thin-film and flexible panels trade efficiency and lifespan for low weight and bendability. They make sense glued to a curved van roof or strapped to a backpack, not as your main array.
Form factor matters more than chemistry for beginners: rigid panels are cheap and durable for permanent mounts; folding "suitcase" panels and solar blankets are what you want if the system travels with you.
2. Charge controller
The charge controller sits between the panels and the battery and prevents the panels from overcharging (and destroying) the battery. There are two kinds:
- PWM (pulse width modulation) controllers are cheap and simple, but they work by dragging the panel down to battery voltage, throwing away any extra. Fine for small, matched 12V setups.
- MPPT (maximum power point tracking) controllers continuously find the panel's most productive operating point and convert that power to whatever the battery needs. With higher-voltage panels — especially on cold, sunny days when panel voltage runs high — a PWM controller can leave roughly 20–30% of your harvest on the table compared to MPPT.
Our rule of thumb: under about 200W of panel on a simple 12V system, PWM is acceptable. Above that, or any time your panels aren't nominal 12V, buy MPPT and never think about it again. We cover this in depth in our MPPT vs PWM guide.
3. Battery bank
The battery stores energy for nights and cloudy days, and it's where your money should go first. Capacity is measured in watt-hours (Wh) — amp-hours times voltage if you're shopping 12V batteries (a 12V 100Ah battery holds roughly 1,280Wh if it's LiFePO4 at 12.8V nominal).
The chemistry decision is easier than it used to be:
- LiFePO4 (lithium iron phosphate) is the right answer for almost every stationary or vehicle system. Expect 3,000–3,500 full charge cycles, the ability to use 80–90% of rated capacity, very stable and safe chemistry, and built-in battery management on any reputable unit. Prices have fallen enough that the old "lithium premium" argument barely applies anymore.
- Standard lithium-ion (NMC) is lighter per watt-hour but typically rated for only about 500–800 cycles. It still makes sense where every pound counts.
- Lead-acid (AGM/gel/flooded) is the lowest upfront cost but you can only safely use about half its rated capacity, it's heavy, and it dies young if you discharge it deeply. We no longer recommend it for new builds except niche cases like rarely-used trickle setups.
We compare the lithium chemistries head-to-head in our LiFePO4 vs lithium-ion guide.
4. Inverter
The inverter converts battery DC into 120V AC household power. Two specs matter: continuous watts (what it can sustain) and surge watts (the brief spike motors and compressors need at startup). One non-negotiable from us: buy pure sine wave, not "modified sine wave." Modified sine inverters are cheaper but make dirty power that can buzz, overheat, or damage motors, CPAPs, and sensitive electronics. Pure sine is cheap enough now that there's no good reason to compromise.
Also note: anything with a heating element or compressor — kettles, space heaters, microwaves, air conditioners — pulls enormous power. A single 1,500W space heater will flatten a 1,000Wh battery in 40 minutes. Off-grid living means heating with propane or wood and saving electricity for everything else.
Sizing your system: the 15-minute version
Don't buy anything until you've done this math. It's four steps:
- Add up your daily watt-hours. List each device, its watts, and hours of use per day. A laptop at 60W for 4 hours is 240Wh. A 12V fridge averaging 45W around the clock is roughly 1,000Wh. Most weekend campers land between 300 and 800Wh per day; full-time van and RV folks usually land between 1,500 and 3,000Wh.
- Add 30% for losses. Charge controllers, battery round-trip efficiency, inverters, and wiring all eat power. Multiply your total by 1.3.
- Size the battery for 1–2 days of autonomy. If you need 1,000Wh a day after losses, a 2,000–2,500Wh bank rides through a cloudy day without drama.
- Size panels to refill in one decent day. Divide your daily watt-hours by your local peak sun hours — roughly 5–6 in the Southwest, 4–5 across the middle of the country, 3–4 in the Pacific Northwest, and noticeably less everywhere in winter. 1,000Wh a day ÷ 4 sun hours means about 250W of panel, and we'd round up to 300–400W because real conditions are never ideal.
That's the whole framework. Our system sizing guide walks through worked examples, including the quick-reference chart we use ourselves.
The easiest way to start: a power station
Here's the advice we give every beginner: don't build your first system — buy it. A portable power station packages the battery, charge controller, inverter, and all the protective electronics into one box with outlets on the front. You plug a folding panel into one port and your devices into the others. There is no wiring to size, no fuses to spec, and nothing you can hook up backwards.
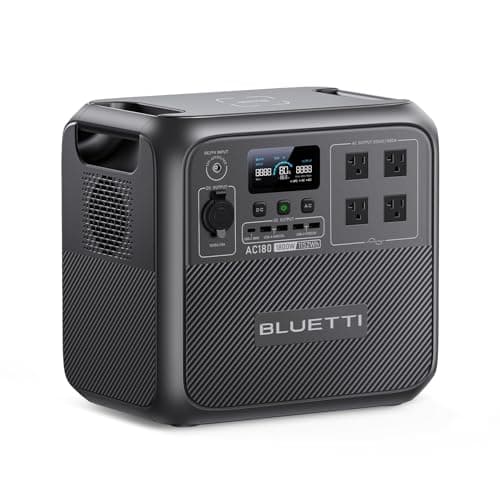
BLUETTI
BLUETTI AC180
Our favorite all-rounder: 1,152Wh of LiFePO4, a real 1,800W inverter, and fast wall charging at a price that routinely undercuts the big names.
A unit in the 1,000Wh class with LiFePO4 cells covers a remarkable amount of real life: a weekend of camping with a 12V fridge, a home-office day during a blackout, or the backbone of a starter van setup. If you'd rather get the panel matched and boxed with the station, a bundled kit removes the last bit of guesswork:
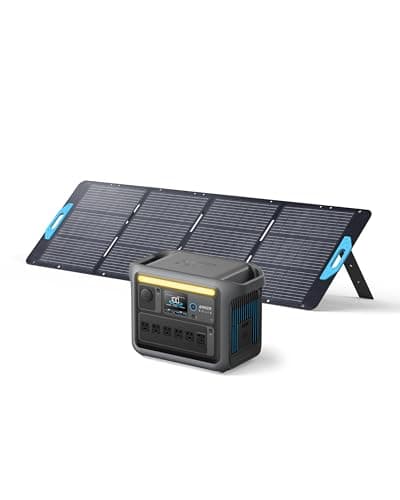
Anker
Anker SOLIX C1000 + 200W Panel
The best mid-size solar generator bundle we’ve tested: 1,056Wh LiFePO4 station with a genuinely efficient 200W folding panel.
The honest trade-off: per watt-hour, power stations cost more than DIY components. You're paying for integration and safety. For a first system, we think that's money well spent — most people who start with a power station and later build a bigger DIY bank end up keeping the station as their portable unit anyway.
When DIY components make sense
Build from components when any of these are true: you need more than about 2–3kWh of storage, the system lives permanently in a vehicle or cabin, or you enjoy the project itself. A classic starter build — 200W of rigid roof panel, a 30A controller, a 100Ah LiFePO4 battery, and a 1,000W pure sine inverter — costs meaningfully less per watt-hour than an equivalent power station and expands gracefully.
If you go this route, spend on the battery and charge controller, economize on panels (watts are watts from any reputable maker), and buy quality wiring and fusing. Every circuit between the battery and anything else needs an appropriately sized fuse or breaker — batteries store enough energy to turn a wiring fault into a fire, and fuses are cheap insurance.
Mistakes we see beginners make
- Buying panels first. Panels are the cheap, easy part. Size the battery and loads first; the panel count falls out of that math.
- Trusting advertised capacity. Plan around 80–85% of a power station's rated watt-hours actually reaching your devices through the inverter.
- Ignoring winter. A system sized for July sun delivers maybe half its harvest in December. Size for your worst month you'll actually use it.
- Trying to run heat off batteries. Resistive heating is the fastest way to be disappointed by solar. Heat with fuel; power everything else with the sun.
- Buying no-name electronics. Panels are commodities; controllers, batteries, and inverters are not. Stick with established brands that publish real specs and honor warranties.
What a realistic starter system looks like
Hardware helps more than theory, so here are three honest starting points based on builds we've actually done or recommended.
The taste test. A 300Wh-class LiFePO4 power station and a 60–100W folding panel. This runs lights, phones, a laptop, and a fan on a weekend trip, and it doubles as a blackout kit at home. It will not run a fridge or anything with a heating element, and that's fine — the point is learning how watt-hours feel in real life before you spend serious money. Almost everything you learn at this scale transfers upward.
The workhorse. A 1,000Wh-class LiFePO4 station with 200–400W of folding panel. This is the setup we recommend most often, because it covers the majority of real use cases: a weekend with a 12V fridge, a work-from-anywhere day, or several hours of essential-circuits duty during an outage. Buy more solar input ceiling than you need today — it's the one spec you can't upgrade later.
The permanent DIY install. A 200W rigid panel kit, 200–280Ah of LiFePO4 battery, an MPPT controller, and a 1,000W pure sine inverter, wired into a van, RV, or shed. More work, more learning, and notably more usable energy per dollar spent than any power station. This is the natural second system for most people — and a perfectly good first one if you enjoy wiring.
One budgeting rule we always pass along: whatever you plan to spend, hold back 10–15% for the boring parts — cables, fuses, connectors, mounting hardware, and a decent crimping tool if you're going DIY. Skimping there undermines everything upstream of it.
Living with the system: maintenance and growth
The good news about a modern LiFePO4-based system is that there's almost no maintenance — no water topping, no equalization charges, no monthly rituals. What's left is simple and worth doing:
- Keep panels clean and unshaded. Dust, pollen, and bird droppings cost real harvest. A rinse and a soft brush every month or two is plenty. Watch how shade moves across your site through the seasons — a branch that was harmless in June can halve your December output.
- Check connections once or twice a year. Vibration (vehicles) and thermal cycling (everything) loosen terminals over time. A five-minute pass with a screwdriver and a sniff test for warm connectors prevents most failures we've seen.
- Store batteries half-charged if idle. If a power station or battery bank will sit unused for months, leave it around 50–60% charge in a cool place and top it up every few months. Storing any lithium battery full and hot is the fastest way to age it.
- Watch your numbers for a season. Most controllers and stations log daily harvest. Compare a few weeks of real data to the sizing math you did — it'll tell you whether your next dollar should go to panels, battery, or nothing at all.
Growth is where planning ahead pays. If you bought an MPPT controller with voltage headroom, adding a panel is a 20-minute job. If you bought a power station, check whether your model accepts expansion batteries before you need one. And resist the urge to add capacity you haven't proven you need — a season of usage data beats every forum opinion.
Where to go next
Start with our best portable power stations to see the units we'd actually buy this year, then work through how to size your solar system before you spend a dollar on panels.